Rachel's Kitchen and Laundry Renovation: The Full Budget Breakdown
We all love a beautiful renovation reveal. The gorgeous tiles, carefully chosen finishes and that satisfying moment when everything finally comes together. But when you're planning your own renovation, there's one thing that's especially helpful to know: how much does it actually cost?
From cabinetry and trades to tiles and tapware, understanding the real costs behind a renovation can make planning your own feel a whole lot easier.
Rachel Fuller (@rachelfuller_) has shared the full breakdown of her kitchen and laundry renovation on Victoria's Mornington Peninsula, including where her $39,190 went, the areas she saved by doing the work herself and the lessons she learnt along the way. With a $30,000 starting budget, two young boys and plenty of DIY involved, there's a lot to take away from her experience.
From a cramped kitchen to a space the whole family loves
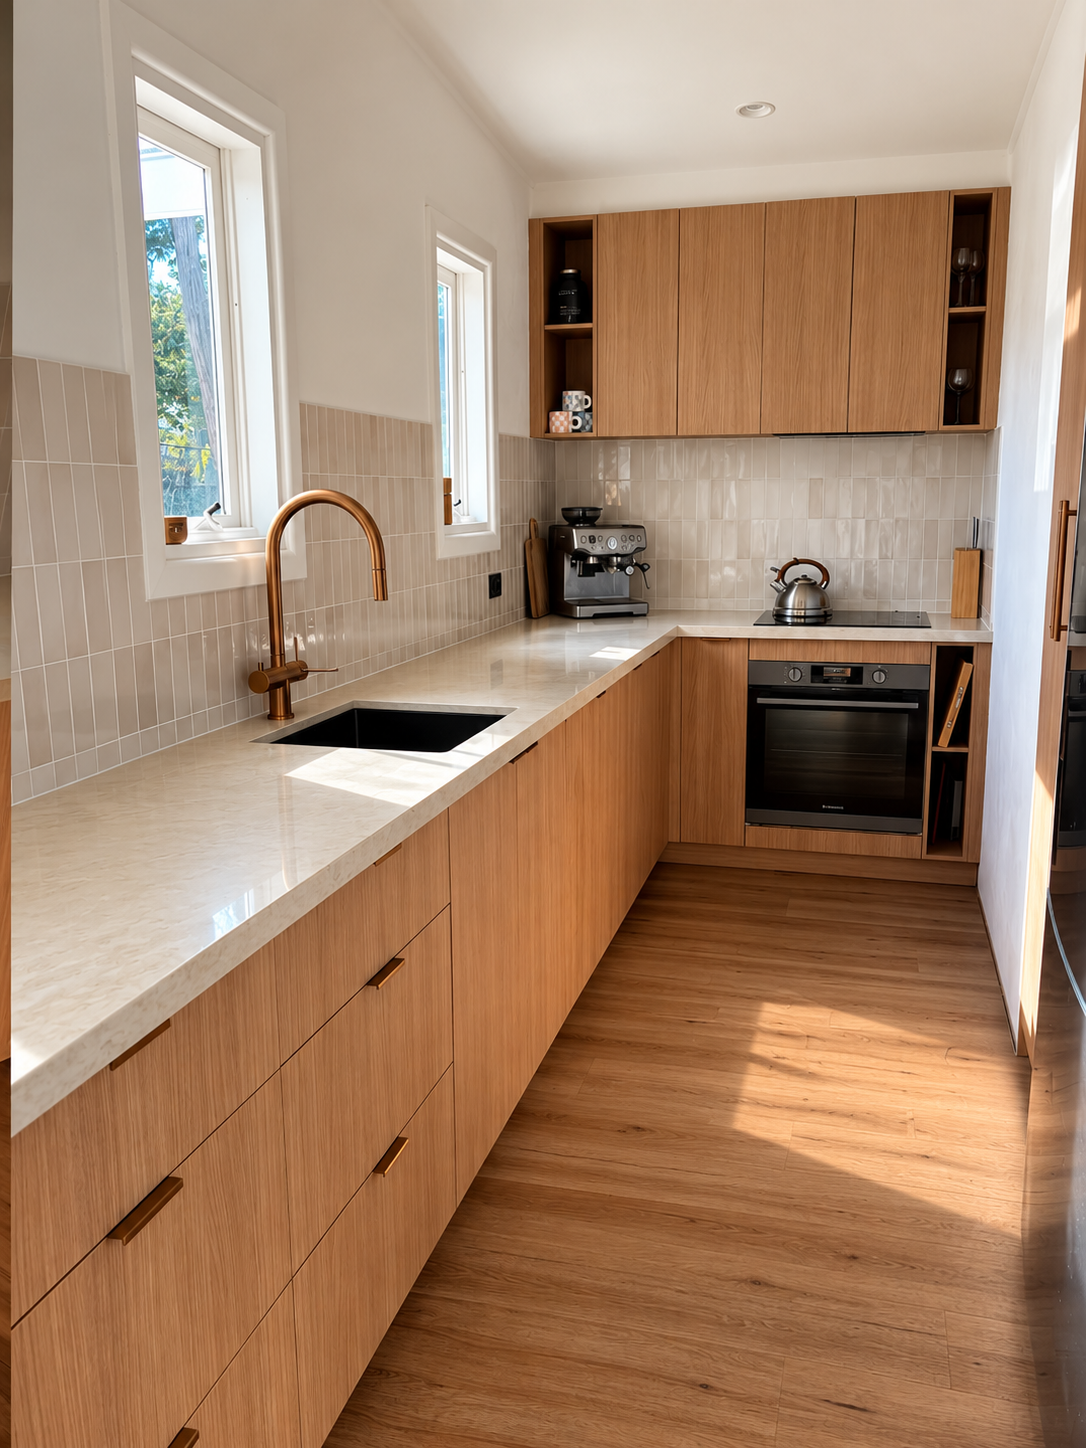
Rachel's renovation began with a kitchen that wasn't quite working for her family. At just 4.2m x 2.4m, the combined kitchen and European laundry space had its limitations. The kitchen had a tiny sink, very little bench space and an old oven that needed to be lit with a lighter.
Rachel wanted something more functional, but she also had a clear vision for how she wanted the finished space to feel. Initially, she hoped to make the kitchen larger, but changing the footprint would have meant moving walls, adding cabinetry and increasing the amount of stone needed for the benchtops.
Instead, Rachel decided to keep the existing galley layout and put more of her budget towards the finishes she really loved. She also changed the position of the sink and oven, creating space for a much larger sink and more usable bench space. While this added to the plumbing costs, Rachel felt it was absolutely worth it.
"Our budget wasn't big enough to change the layout, so we had to stick with the galley footprint which I was pretty bummed about, but now that it's all finished it's such a beautiful space to be in."
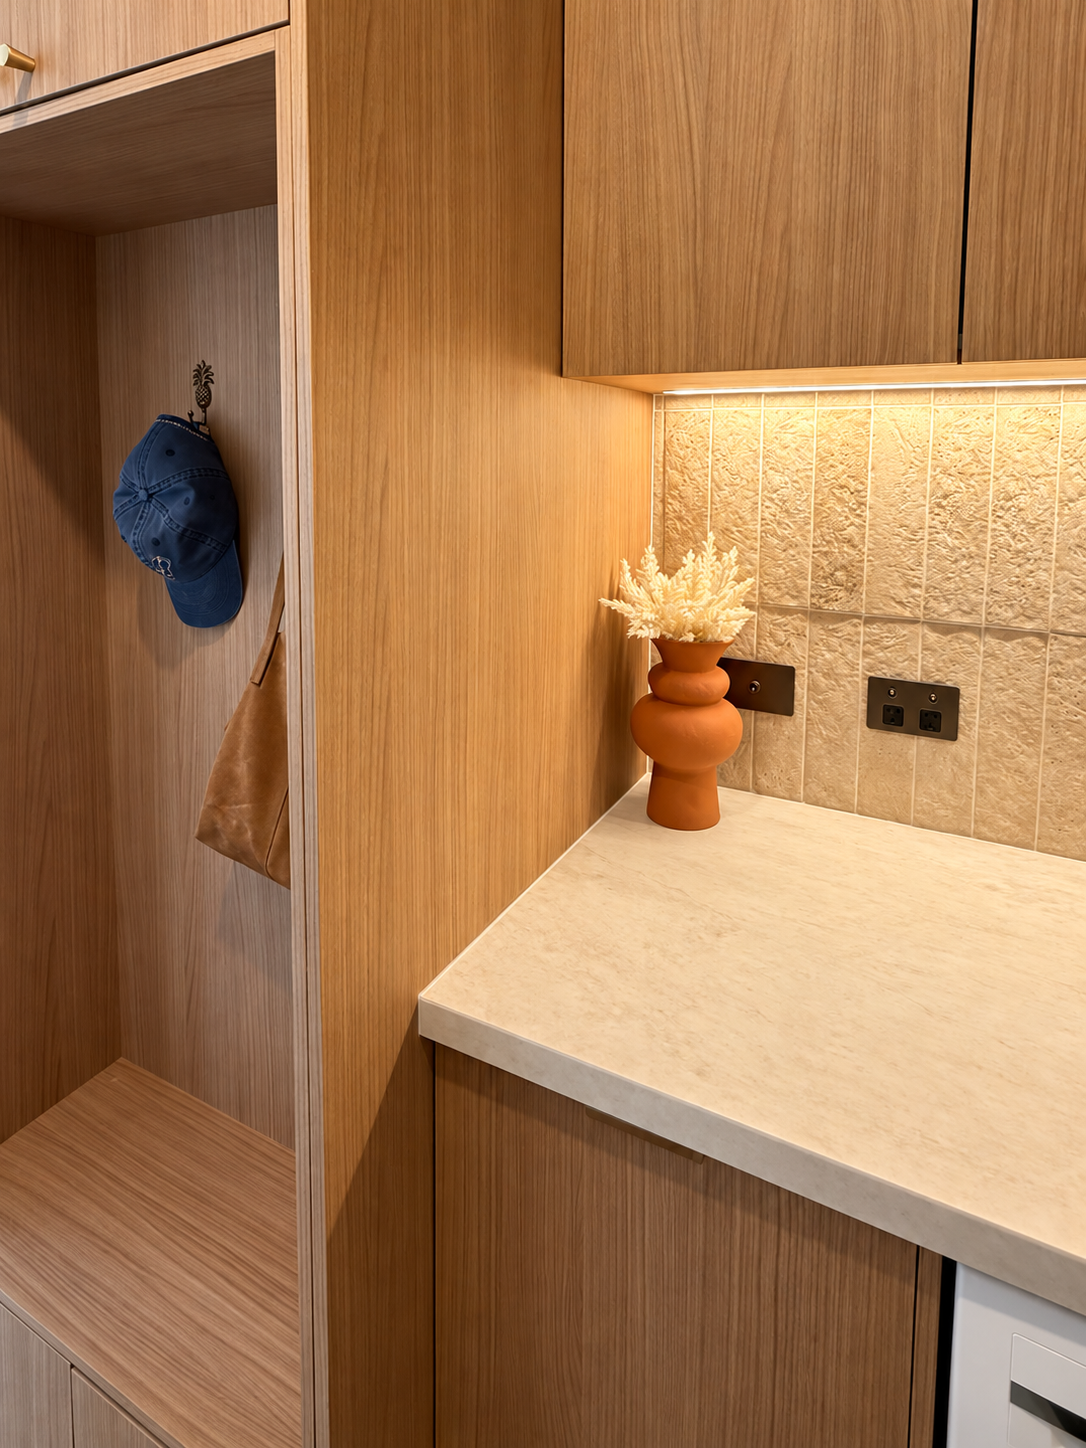
The laundry was another opportunity to make better use of the available space. Previously an enclosed cupboard housing the washer and dryer, Rachel decided to remove the doors and open it up to the hallway. The change gave the space more storage and made it feel much bigger, while creating a laundry that now feels like part of the home's design rather than something hidden away.
She also incorporated a little mudroom area with hooks for bags, hidden storage above and below, and a pull out hamper. For a family living in a small home, making every bit of storage count was an important part of the design.
So, how much did Rachel's kitchen and laundry renovation cost?
Let's get into the numbers.
Rachel originally planned to spend $30,000, but the kitchen and laundry renovation ended up costing $39,190, approximately $9,190 over her initial budget.
Part of that increase came from expanding the project to include the laundry, which wasn't originally part of the plan. As Rachel explains, "We hadn't initially planned to do the Laundry….. But somehow it got added to cart."
She also made the decision to invest in some higher priced finishes after realising she wouldn't be able to expand the kitchen.
Rachel's full renovation budget breakdown
| Renovation expense | Cost |
|---|---|
| Demolition and disposal | $0 |
| Kitchen and laundry cabinetry, including stone benchtops and GST | $26,380 |
| New kitchen appliances | $4,073 |
| Kitchen sink | $775 |
| Three way kitchen mixer tap | $885 |
| Water filtration system | $280 |
| Laundry tap | $275 |
| Laundry sink | $302 |
| Brass pineapple hooks | $12 |
| Pantry pulls | $82 |
| Electrical work | $2,500 |
| Plumbing | $1,900 |
| TileCloud kitchen and laundry tiles, including delivery | $1,021 |
| Tiling labour | $0 |
| Tile cutter hire | $28 |
| Grout, silicone, adhesive, laser level and spacers | $250 |
| Lighting, switches and power points | $665 |
| Plastering and building supplies | $300 to $500 |
| Paint | $100 |
| Rachel's total | $39,190 |
These are the figures Rachel supplied. Her individual line items are approximate. Costs reflect her renovation on Victoria's Mornington Peninsula and will vary between projects.
The biggest expense was cabinetry and stone benchtops, accounting for approximately two thirds of her budget. Rachel spent $26,380 on cabinetry for both spaces, including stone benchtops, with approximately $6,000 going towards the stone alone.
Although it was a significant investment, Rachel felt the stone made a huge difference to the finished kitchen.
Where Rachel decided to splurge
Renovating on a budget doesn't mean choosing the cheapest option for everything. For Rachel, it was about working out which details would make the biggest difference to her everyday life.
There were three things she was particularly happy to invest in.
1. Kitchen splashback tiles
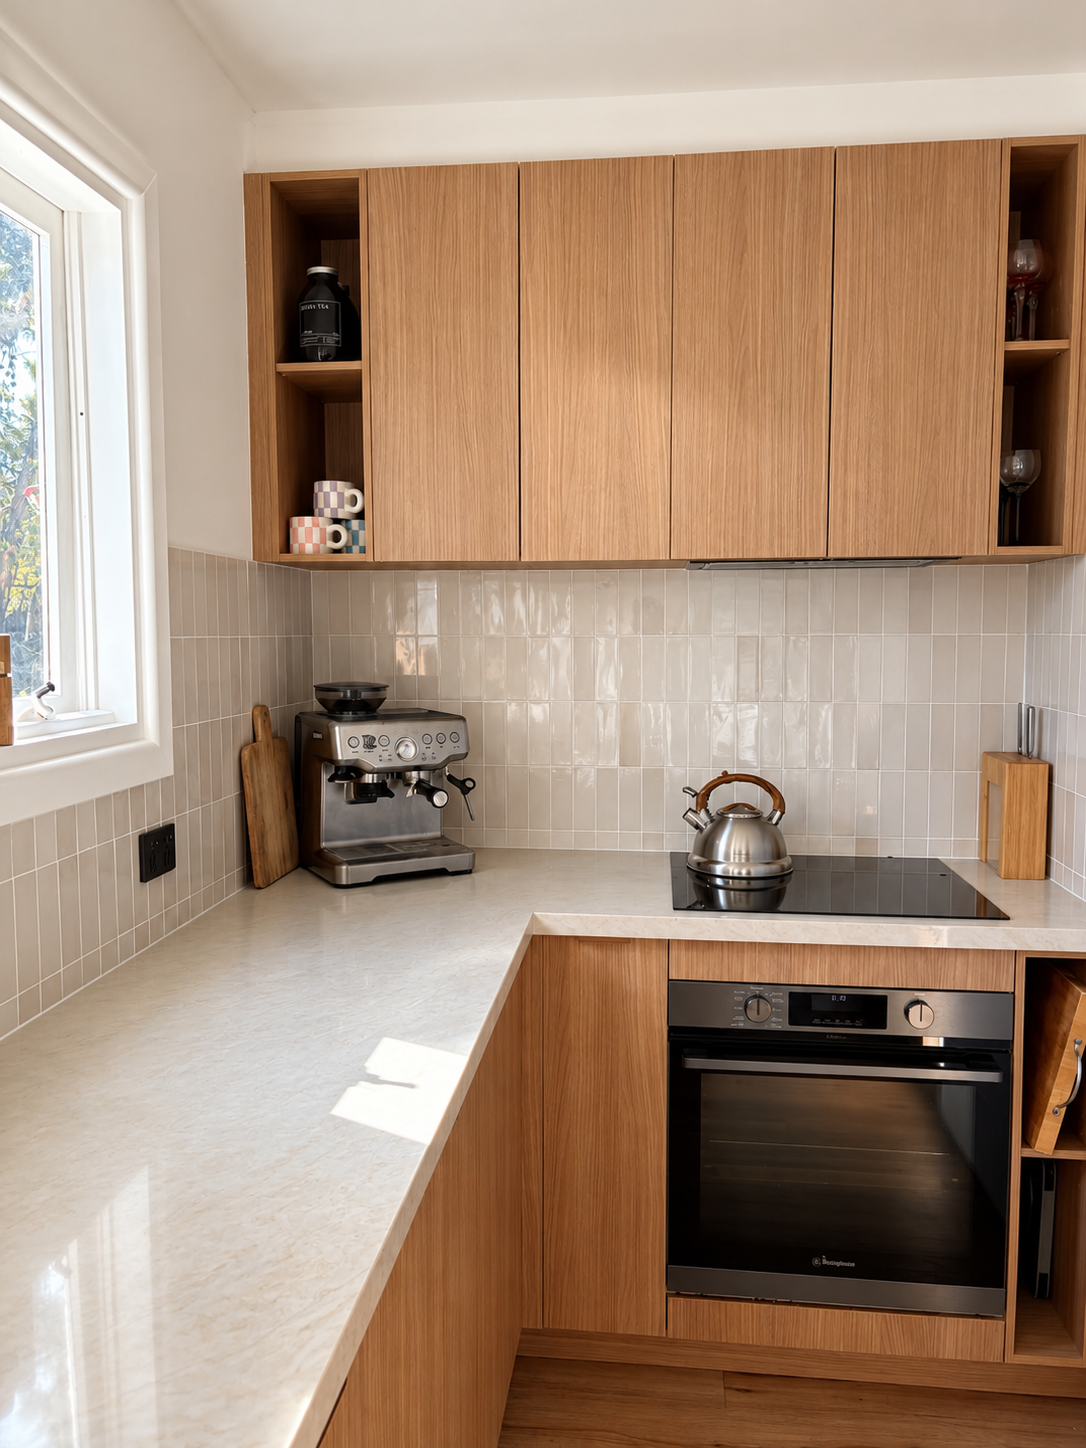
Rachel chose our Noosa Semi Gloss Zellige Bone Subway Tile for her kitchen splashback, drawn to its subtle variation in colour and texture. The soft, warm finish works beautifully with her timber look cabinetry and beige stone benchtops, bringing plenty of character to the space.
The tile choice also had a practical benefit. Rachel planned to do the tiling herself, despite having no previous professional experience. She deliberately chose a zellige look tile because its natural variation would be more forgiving of small imperfections during installation.
2. The kitchen tap and sink
At $885, Rachel's three way kitchen mixer was one of her more expensive individual fittings, but it's a purchase she's particularly happy with. The tap provides filtered drinking water and features a pull out function, making it easier to clean the sink, large cutting boards and pans.
She also chose a copper kitchen sink for $775, creating a matching look with the tapware. While both were significant purchases, Rachel loves the way they look and how practical they've been for everyday use.
3. Stone benchtops
The stone benchtops were another major investment, costing approximately $6,000 within the cabinetry budget. Rachel loved the finished look and felt the stone made the kitchen feel much more luxe.
By keeping the existing galley footprint, she was able to prioritise finishes like these without taking on the additional costs of extending the kitchen.
Where Rachel saved thousands
While Rachel chose to spend more on certain finishes, she also found ways to keep other costs down. And her biggest saving came from rolling up her sleeves.
Taking on the DIY
Rachel and her husband completed much of the renovation themselves, including demolition, plastering, cabinetry installation, tiling and painting. They also kept some of the old kitchen cabinetry for storage underneath the house and used tip vouchers to dispose of the remaining materials.
This meant their demolition and tiling labour costs were both $0.
Rachel's husband had previously worked as a bricklayer, so he was comfortable with hands on work, although much of the renovation was new territory for both of them. Rachel, who works as an emergency nurse and in women's health, taught herself how to tile by watching YouTube videos.
She hired a tile cutter from Bunnings for $28 and spent approximately $250 on grout, silicone, adhesive, spacers and a laser level. Her verdict on the laser level? "I mean you don't need the laser level but gosh it helped so much!"
While DIY isn't suitable for every task, Rachel estimates that completing these parts of the renovation themselves saved thousands in labour costs.
Shopping around for cabinetry
Before choosing a cabinet maker, Rachel obtained three different quotes. Interestingly, she found that flat pack options weren't significantly cheaper than having cabinetry made for the space.
She chose a cabinet maker she felt comfortable working with, who offered a quick turnaround and was happy for Rachel and her husband to complete the installation themselves.
The cabinets arrived just four weeks after they finalised their selections.
Choosing more affordable laundry fittings
Rachel also made some smart swaps when choosing fittings for the laundry. Rather than purchasing the same copper sink and tapware as the kitchen, she opted for less expensive alternatives.
Her laundry sink cost $302, and her laundry tap was purchased for $275 during a sale. Although the copper finishes weren't an exact match, Rachel found that the difference was barely noticeable.
She also used discounts from the Three Birds Renovation School, which she completed in 2020, saving between 10% and 20% on a number of purchases.
The TileCloud tiles Rachel chose
Rachel selected tiles for both her kitchen and laundry, spending $1,021 with TileCloud, including delivery.
For the kitchen splashback, she chose the Noosa Semi Gloss Zellige Bone Subway Tile, while the Thirroul Travertine Look Matte Subway Tile was selected for the laundry splashback. Both bring natural texture into the spaces, complementing the warm finishes used throughout the renovation.
Rachel also has plans to use our Northbridge Peach Terracotta Look Subway Tile for the laundry floor, which was still on her list of finishing touches when she shared her renovation story.
Before purchasing, Rachel ordered tile samples to see the finishes in person. She also appreciated the quick customer service and delivery, particularly when she needed help applying a discount code.
What didn't go to plan?
Like most renovations, Rachel's project came with a few surprises.
During demolition, she discovered that a dividing wall between the fridge and pantry wasn't structural. Removing it could have allowed her to push the fridge further back and create a more streamlined finish.
Unfortunately, by the time they made the discovery, changing the cabinetry would have pushed the project beyond their budget. So they stuck with the original design.
The DIY work also came with its challenges. There were plenty of unfamiliar tasks, moments of uncertainty and a few things that didn't work the first time. As Rachel puts it, the hardest part was dealing with "a lot of unknown, guessing, doubting ourselves."
But looking back, she considers the DIY work one of the best decisions they made.
Living through the renovation with two kids
As if renovating a kitchen and laundry wasn't enough, Rachel and her husband were also juggling work and family life.
Rachel works a couple of days a week as an emergency nurse and also works from home in women's health. Her husband works full time as a greenkeeper, and they have two boys, including one who wasn't yet at school.
They also lived in the house throughout the renovation.
To make things manageable, they moved some of their old kitchen cabinetry and benchtops into the living room, creating a temporary kitchen with electrical appliances. The biggest challenge was having no working sink. Because the laundry was being renovated at the same time, the family had to wash their dishes in the bathtub.
Despite the inconvenience, Rachel says the experience wasn't too bad. The kitchen was functional again after approximately five weeks, with the main work moving quickly thanks to how much they completed themselves.
There were still a few finishing details left, including skirting, trim and the laundry floor tiles. And after several weeks without a proper kitchen, Rachel had a new appreciation for her dishwasher.
Rachel's advice for planning a renovation budget
Having completed the project, Rachel has some valuable advice for anyone preparing to renovate.
Her biggest recommendation is to do as much research as possible before committing to purchases. Start by gathering quotes, particularly for major expenses such as cabinetry and trades. Then create a vision board, choose your preferred materials and start pricing everything from appliances to tiles, tapware and fittings.
Rachel used Google Sheets to track her budget, helping her understand the costs before and during the project. She also recommends allowing at least an additional 10% for unexpected expenses.
Her planning process followed a straightforward order:
- Create a vision board.
- Speak with the bank to understand the available budget.
- Gather quotes.
- Build a rough budget.
- Order samples and finalise colours and finishes.
- Lock in the selections.
- Organise trades.
- Start demolition.
And for anyone thinking about taking on some DIY work, Rachel has one final piece of advice:
"Don't be scared to DIY. You might surprise yourself."
Of course, it's important to understand which tasks require licensed trades and which are appropriate to complete yourself.
What should you include in your own renovation budget?
Rachel's experience is a great example of why it's worth understanding the full cost of a renovation before getting started. While tiles, cabinetry and tapware are often the most exciting purchases, there are several other expenses to consider.
Demolition and preparation: Removing existing fixtures, disposing of waste and preparing surfaces for new materials.
Trades: Plumbing, electrical work and any other specialist labour required for your project.
Cabinetry and benchtops: Materials, manufacturing, delivery and installation.
Tiles and installation: Tile quantities, adhesive, grout, trims, waterproofing where required and professional installation if you're not completing the work yourself.
Fixtures and fittings: Sinks, tapware, appliances, lighting, handles and other finishing details.
Unexpected expenses: Additional materials, changes to the scope of work and any surprises discovered during demolition.
Rachel recommends setting aside at least 10% for unexpected costs. It's a useful starting point, although some projects may need a larger contingency depending on their age, condition and complexity.
Remember, every renovation is different. Rachel's costs reflect her specific project, location, product choices and the significant amount of work she completed herself.
A beautiful renovation doesn't have to mean changing everything
One of our favourite things about Rachel's renovation is how much she achieved without changing the kitchen's footprint.
What started as a small, impractical space is now a kitchen she genuinely enjoys spending time in, with more usable bench space, a larger sink, beautiful finishes and better functionality. And by opening up the laundry, she's created a more practical space with additional storage.
While the project came in above the original budget, Rachel's experience shows how carefully considered spending, plenty of research and a willingness to get hands on can help you make the most of what you have.
A huge thank you to Rachel for being so open about her renovation costs and sharing what she learnt along the way.
If you're planning your own kitchen or laundry renovation, explore our range of kitchen and laundry tiles and order samples to start bringing your vision to life.

Layla is a creative at heart, with an Advanced Diploma in Interior Design and being the Senior Marketing and Ecommerce Coordinator here at TileCloud she has a passion for staying up to date with the latest trends within the industry. Known for going down a rabbit hole on Pinterest and being a sucker for a good mood board to kick off any project.