
Bathroom Heights and Placement Guide: The Measurements That Make a Bathroom Feel Right
Planning a bathroom renovation? Getting your fixture heights and placements right early can make the entire space feel more balanced, practical and seamless once complete. From vanity heights and mirror placement to shower niches and towel rails, the small decisions made during planning often have the biggest impact on how your bathroom feels to use every day.
The good news is you don’t need to figure it all out on your own.
This guide breaks down the standard bathroom measurements commonly used across Australian renovations, along with the reasoning behind them, so you can feel more confident making decisions before waterproofing and tiling begin. Whether you’re working with a builder, plumber or tiler, think of this as your practical starting point for creating a bathroom that feels timeless, functional and easy to live with.
Prefer to keep this handy while planning your renovation? Download the full Bathroom Heights & Placement Guide PDF here.
A Few Things Worth Considering Before You Start
Before locking in your bathroom measurements, think about how the space will actually be used day to day.
- The height of your household’s main users
- Tall ceilings may suit slightly higher placement for a more balanced look
- Your tile layout — feature tiles and grout lines can affect where niches and mixers should sit, so it’s worth getting your tiler involved early
- Waterproofing zones may affect what’s possible in your layout, so check with your builder or waterproofer early
Getting your tiler, builder and plumber involved early helps everything feel more seamless once installation begins.
Why Bathroom Measurements Matter More Than You Think
A beautiful bathroom is not just about choosing the right tiles or tapware finishes. It’s about creating a space that feels easy to use and visually balanced from every angle.
The bathrooms that feel the most seamless to use are usually the ones where the planning happened early. Vanity heights, mirror placement, shower niches and towel rails all work together to shape how the room feels once complete. Good placement improves everyday comfort, helps the layout feel visually balanced and allows your tiles, grout lines and fixtures to feel connected rather than competing for attention.
The earlier these details are planned, the easier it becomes to create a bathroom that feels timeless, practical and easy to live with. If you’re still selecting tiles, our guide to Bathroom Tile Ideas for Every Home is a great place to start. Or if you’d like extra help bringing your bathroom together, book a free TileCloud design appointment.
Vanity Heights and Mirror Placement
Your vanity is one of the most used parts of the bathroom, so it needs to feel comfortable every single day. If a vanity is too low, you’ll notice yourself leaning forward awkwardly while washing your face or brushing your teeth. Too high and it can feel uncomfortable for kids or shorter family members.
The goal is to create a height that feels natural while also working visually with your mirror, tapware and tile layout.
Standard Vanity Height
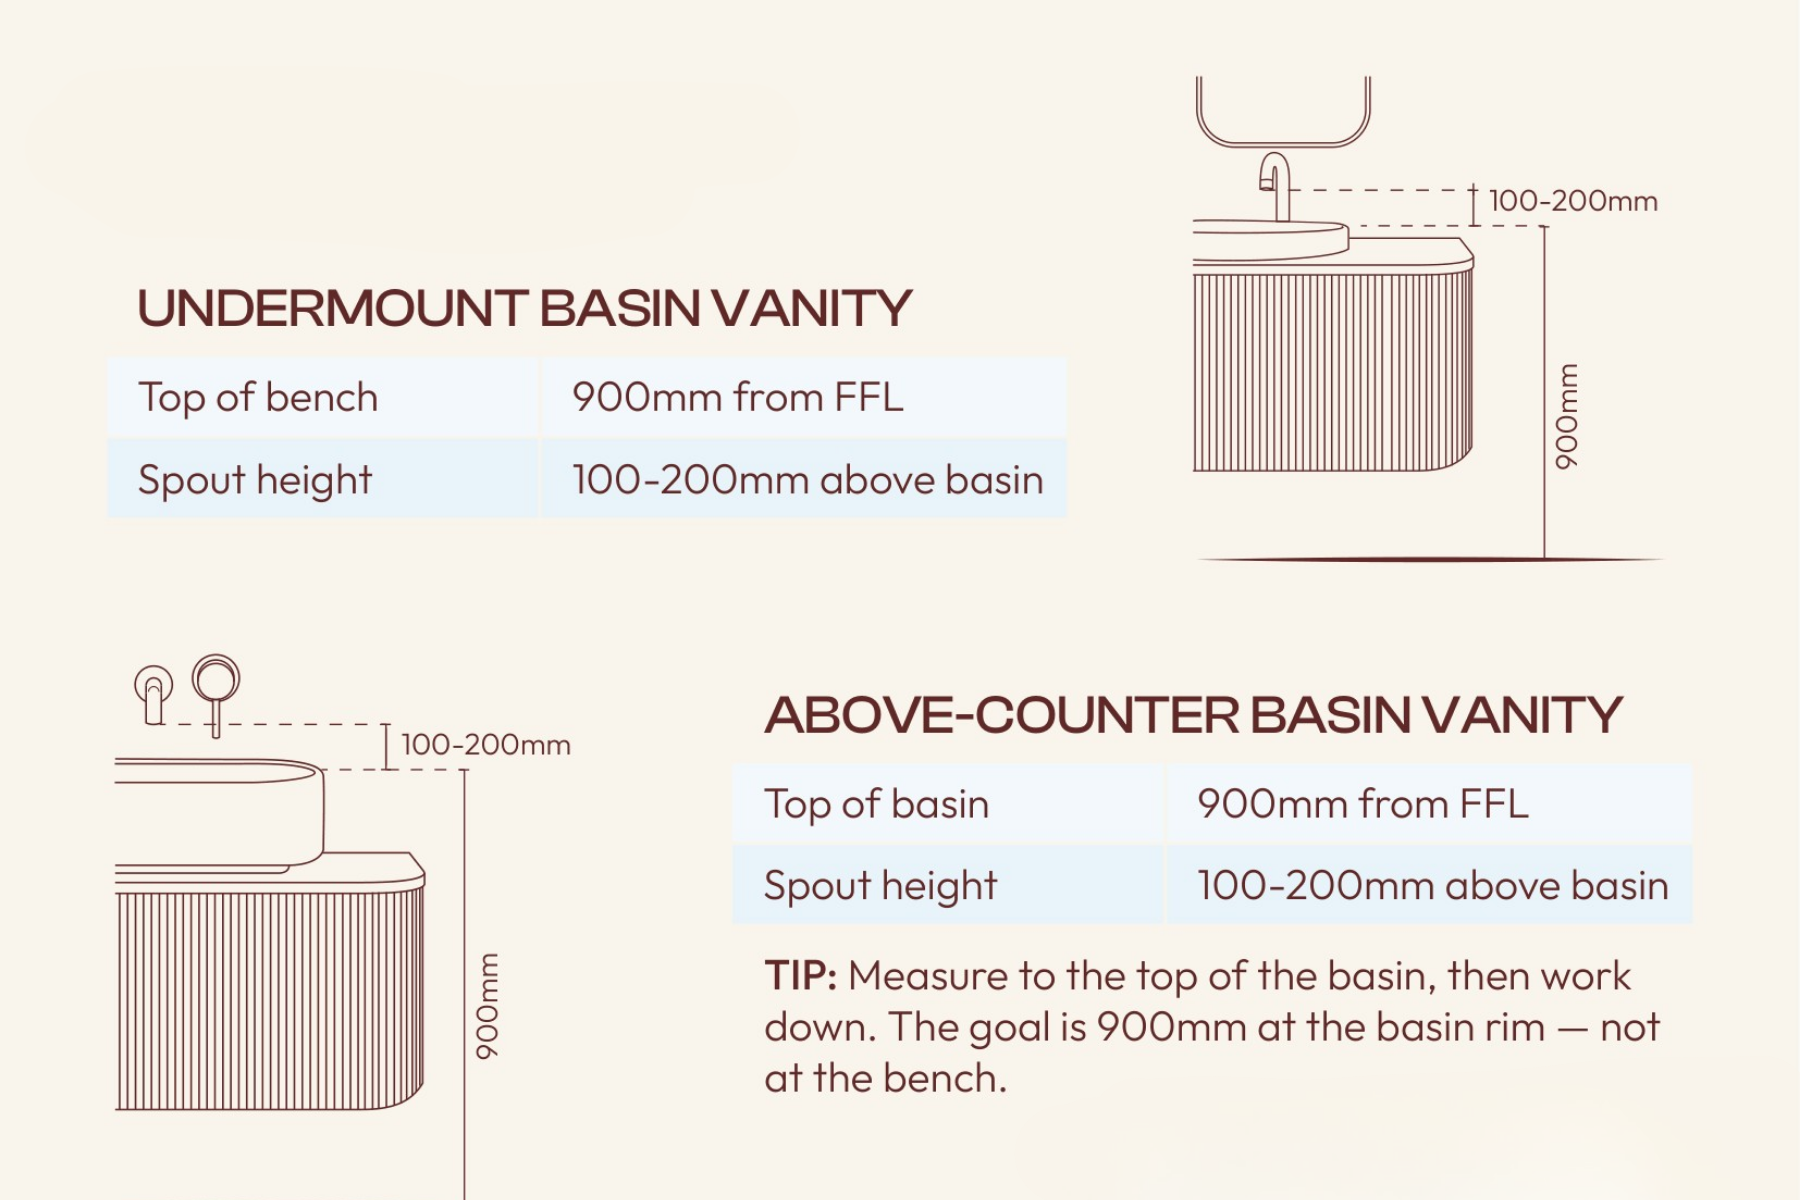
Most Australian bathrooms use a vanity height of around 900mm from finished floor level because it suits the average adult comfortably and creates balanced proportions in the room.
For undermount basin vanities, this measurement is taken from the top of the benchtop.
For above counter basins, the goal is still 900mm overall, but the measurement should be taken from the top rim of the basin, not the bench itself.
Tapware Placement Above Basins
Spout placement is not just about functionality. It changes how refined and balanced the entire vanity area feels.
Too low and water may splash more than you’d like. Too high and the tapware can feel visually disconnected from the basin.
Wall mounted spouts are generally installed:
- 100mm to 200mm above the basin
This gives enough clearance for handwashing while keeping the proportions feeling balanced.
Mirror Height Guidelines
Mirror placement has a surprisingly big impact on how spacious and seamless a bathroom feels.
As a general rule:
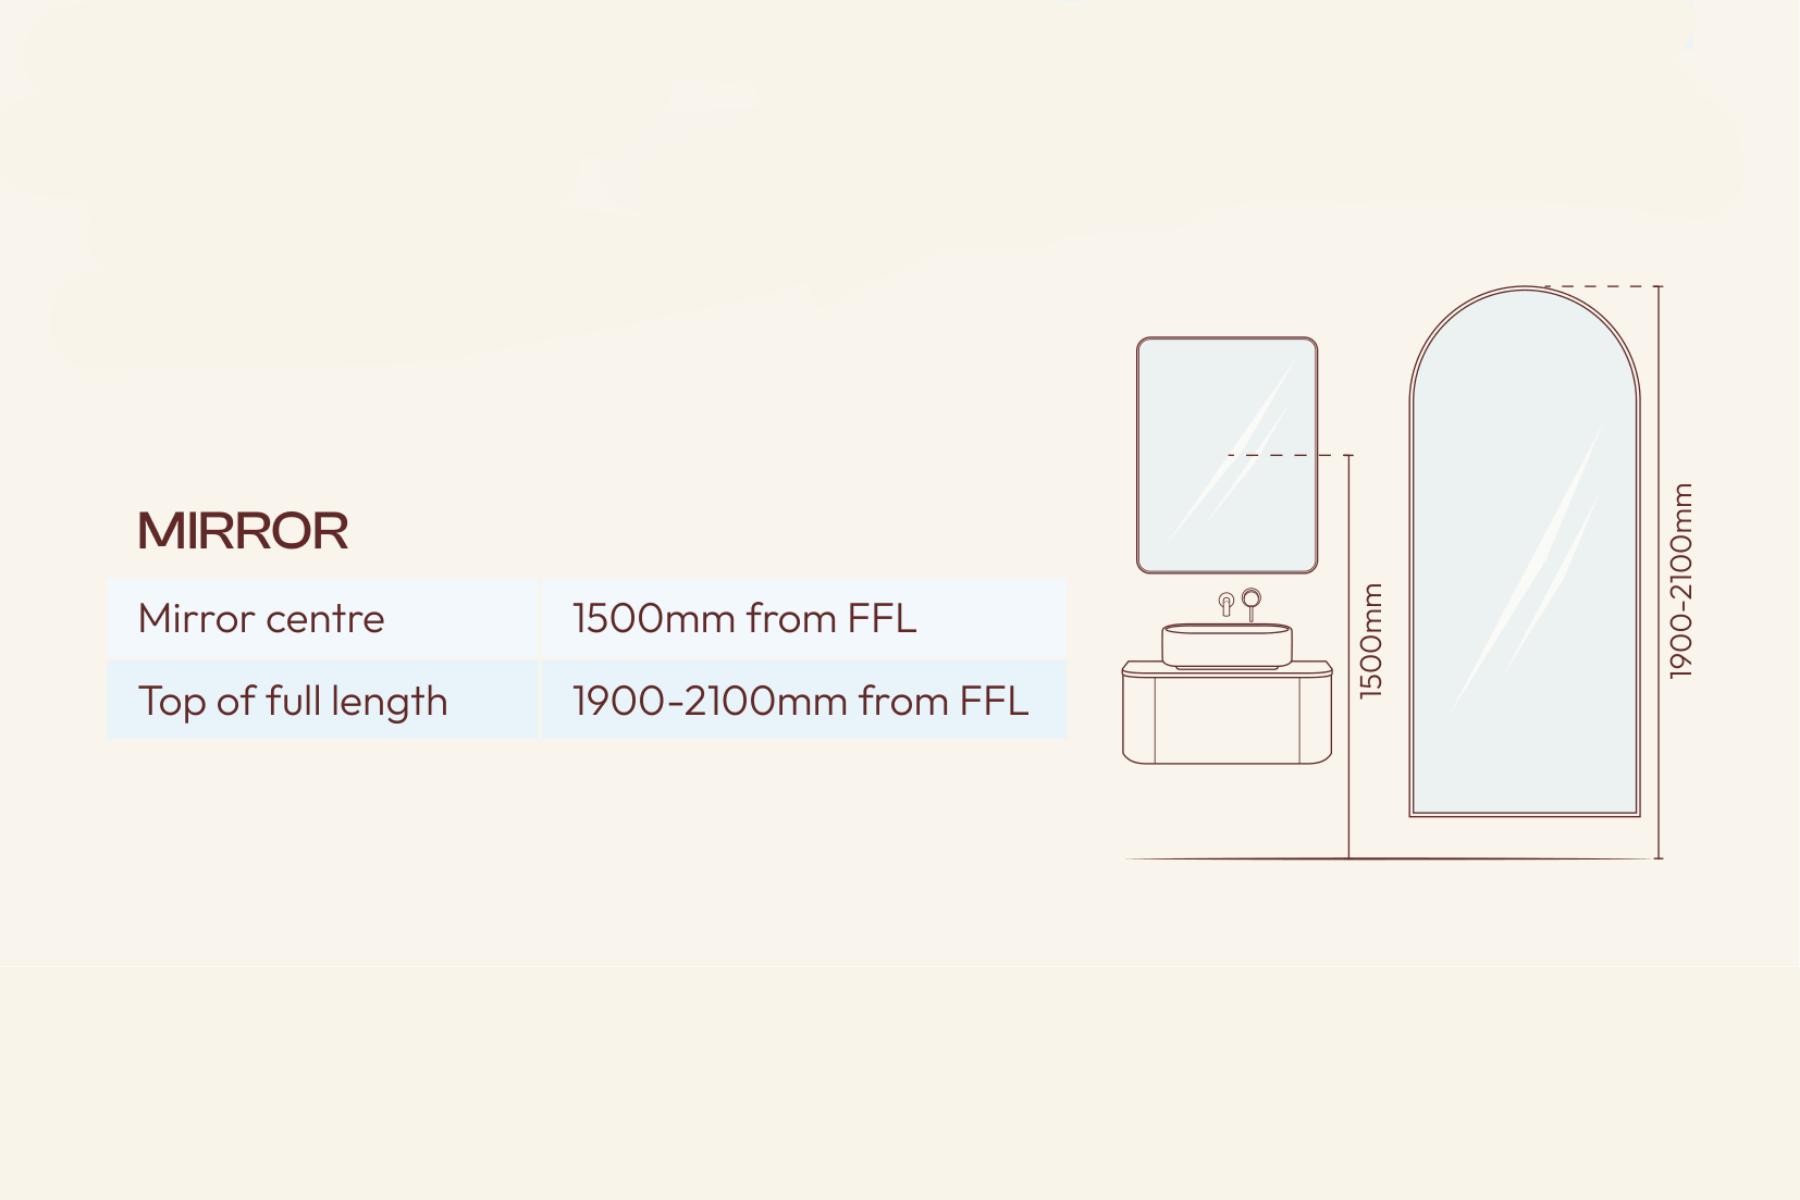
- Mirror centre: 1500mm from FFL
- Top of full length mirrors: 1900mm to 2100mm from FFL
Bathrooms with taller ceilings may suit slightly higher mirror placement to help the proportions feel more balanced overall.
Shower Measurements That Actually Work
The shower is often where good planning makes the biggest difference.
A well positioned shower feels calm, comfortable and easy to use. The best layouts balance practicality with visual symmetry so everything feels connected within the tile layout.
Standard Shower Heights
These measurements work well because they suit most ceiling heights while still feeling generous and open.
A good starting point is:
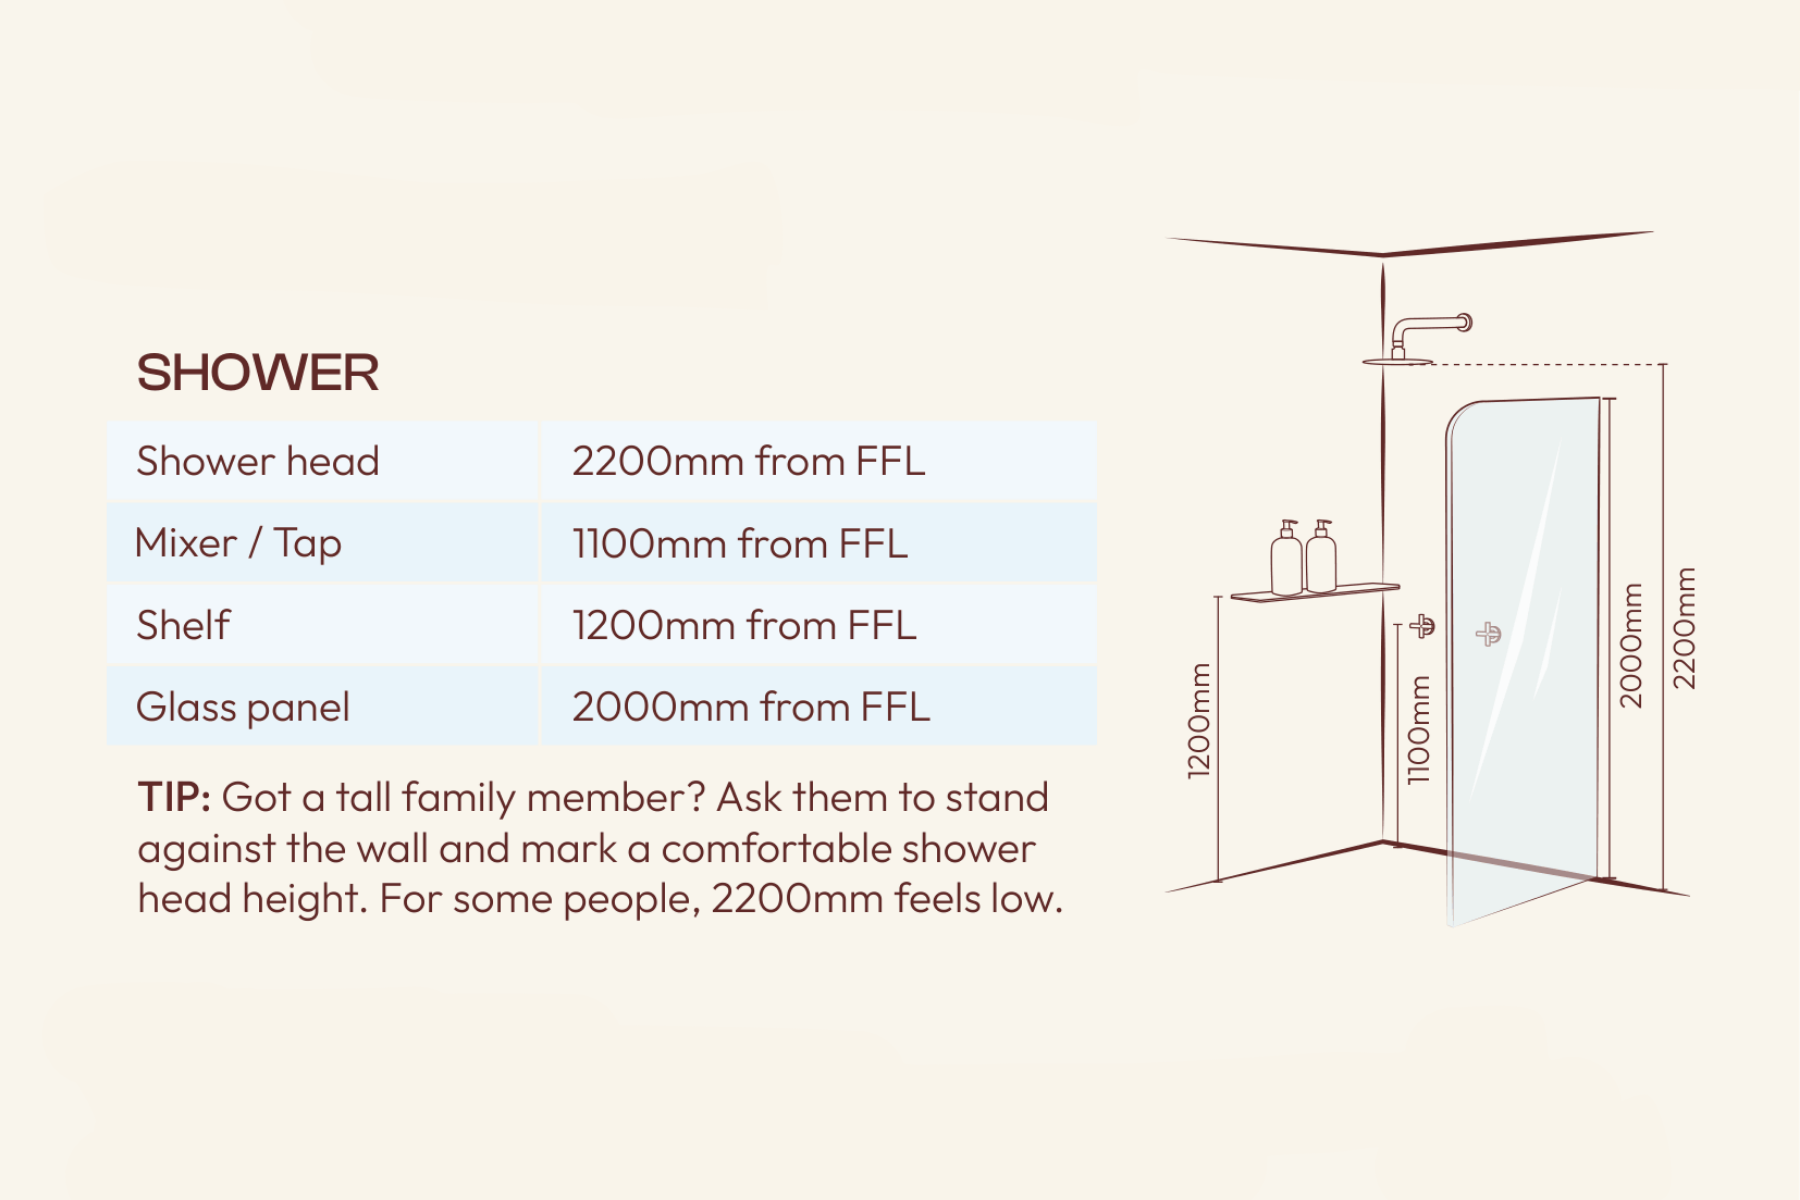
- Shower head: 2200mm from FFL
- Mixer or tap: 1100mm from FFL
- Shower shelf: 1200mm from FFL
- Glass panel height: 2000mm from FFL
If you have taller family members, it’s worth physically testing the shower height before installation.
Shower Niche Placement
Shower niches are one of those small details that can completely change how custom a bathroom feels and functions.
When positioned properly, they blend seamlessly into the tile layout, creating a cohesive and well-designed shower space.
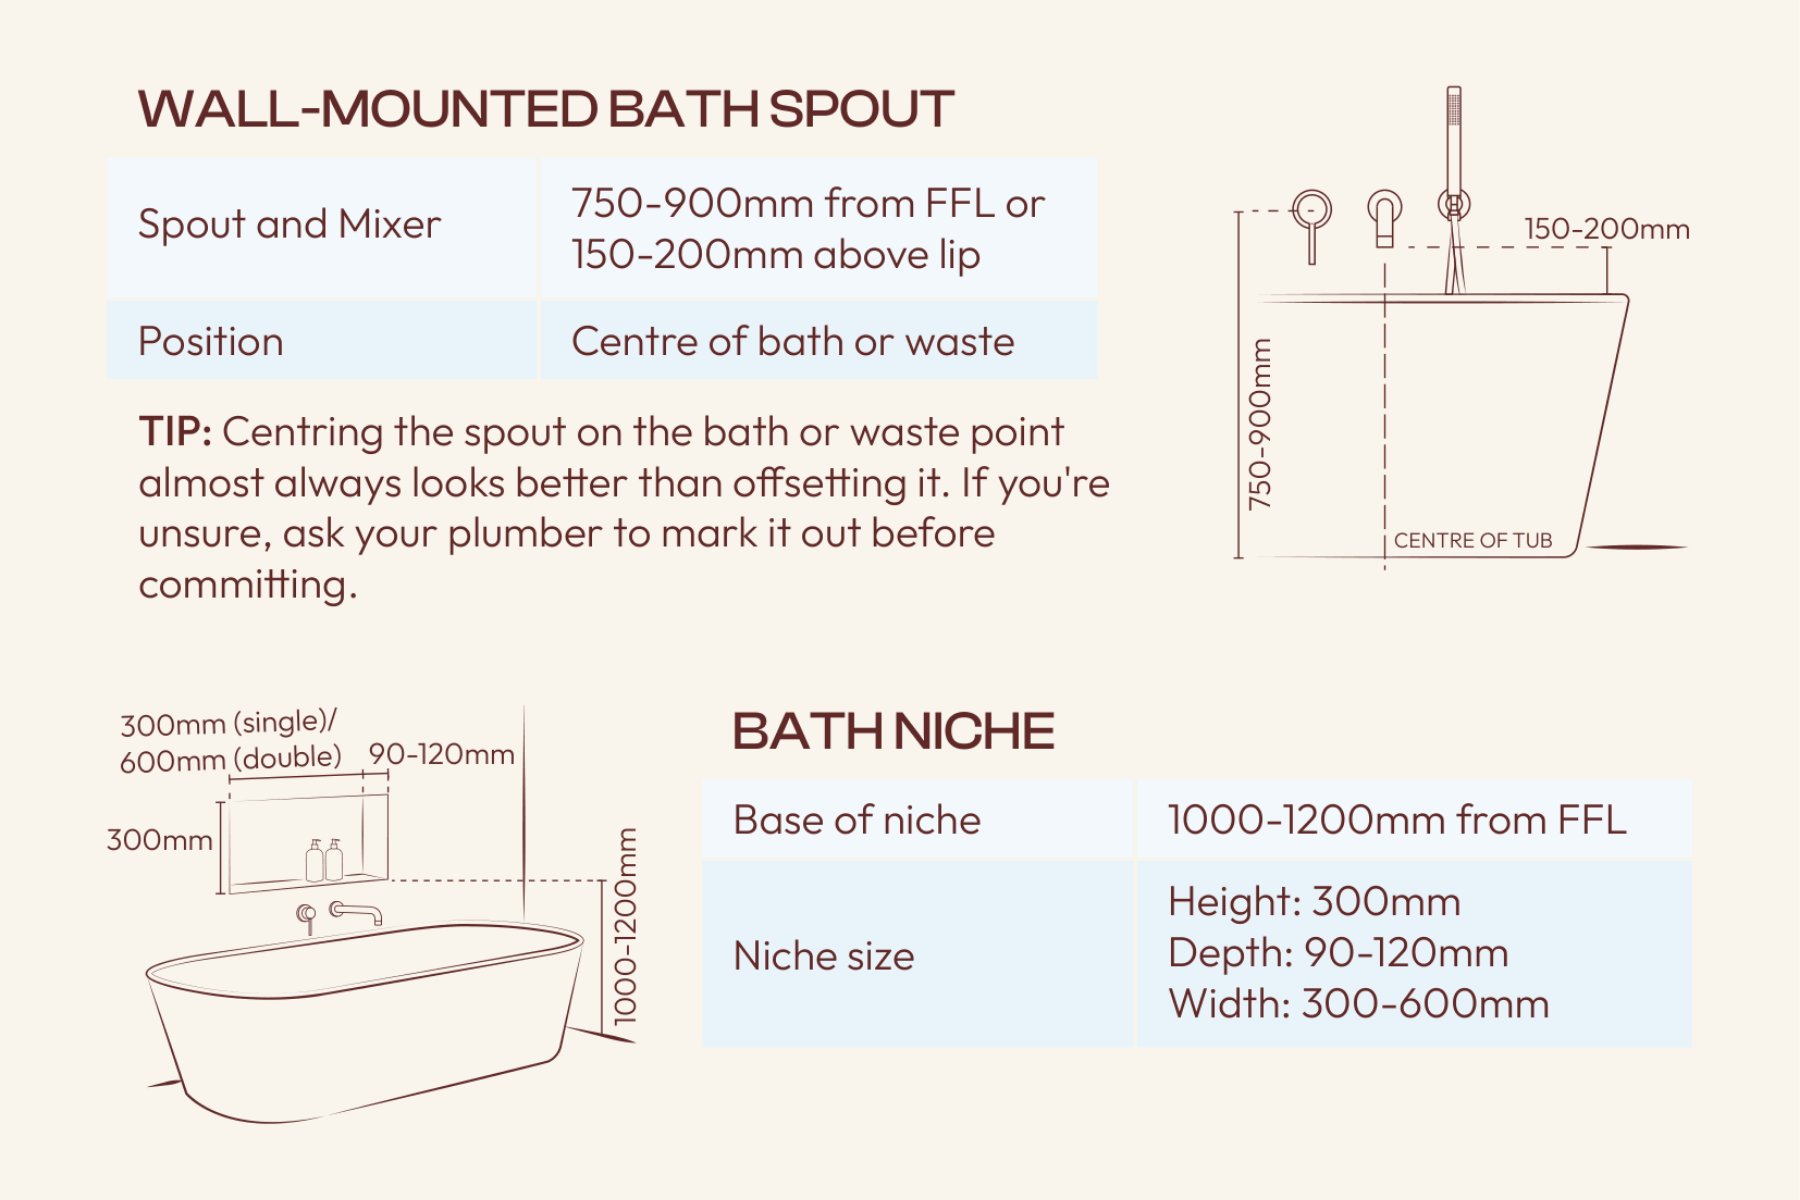
Standard niche measurements are:
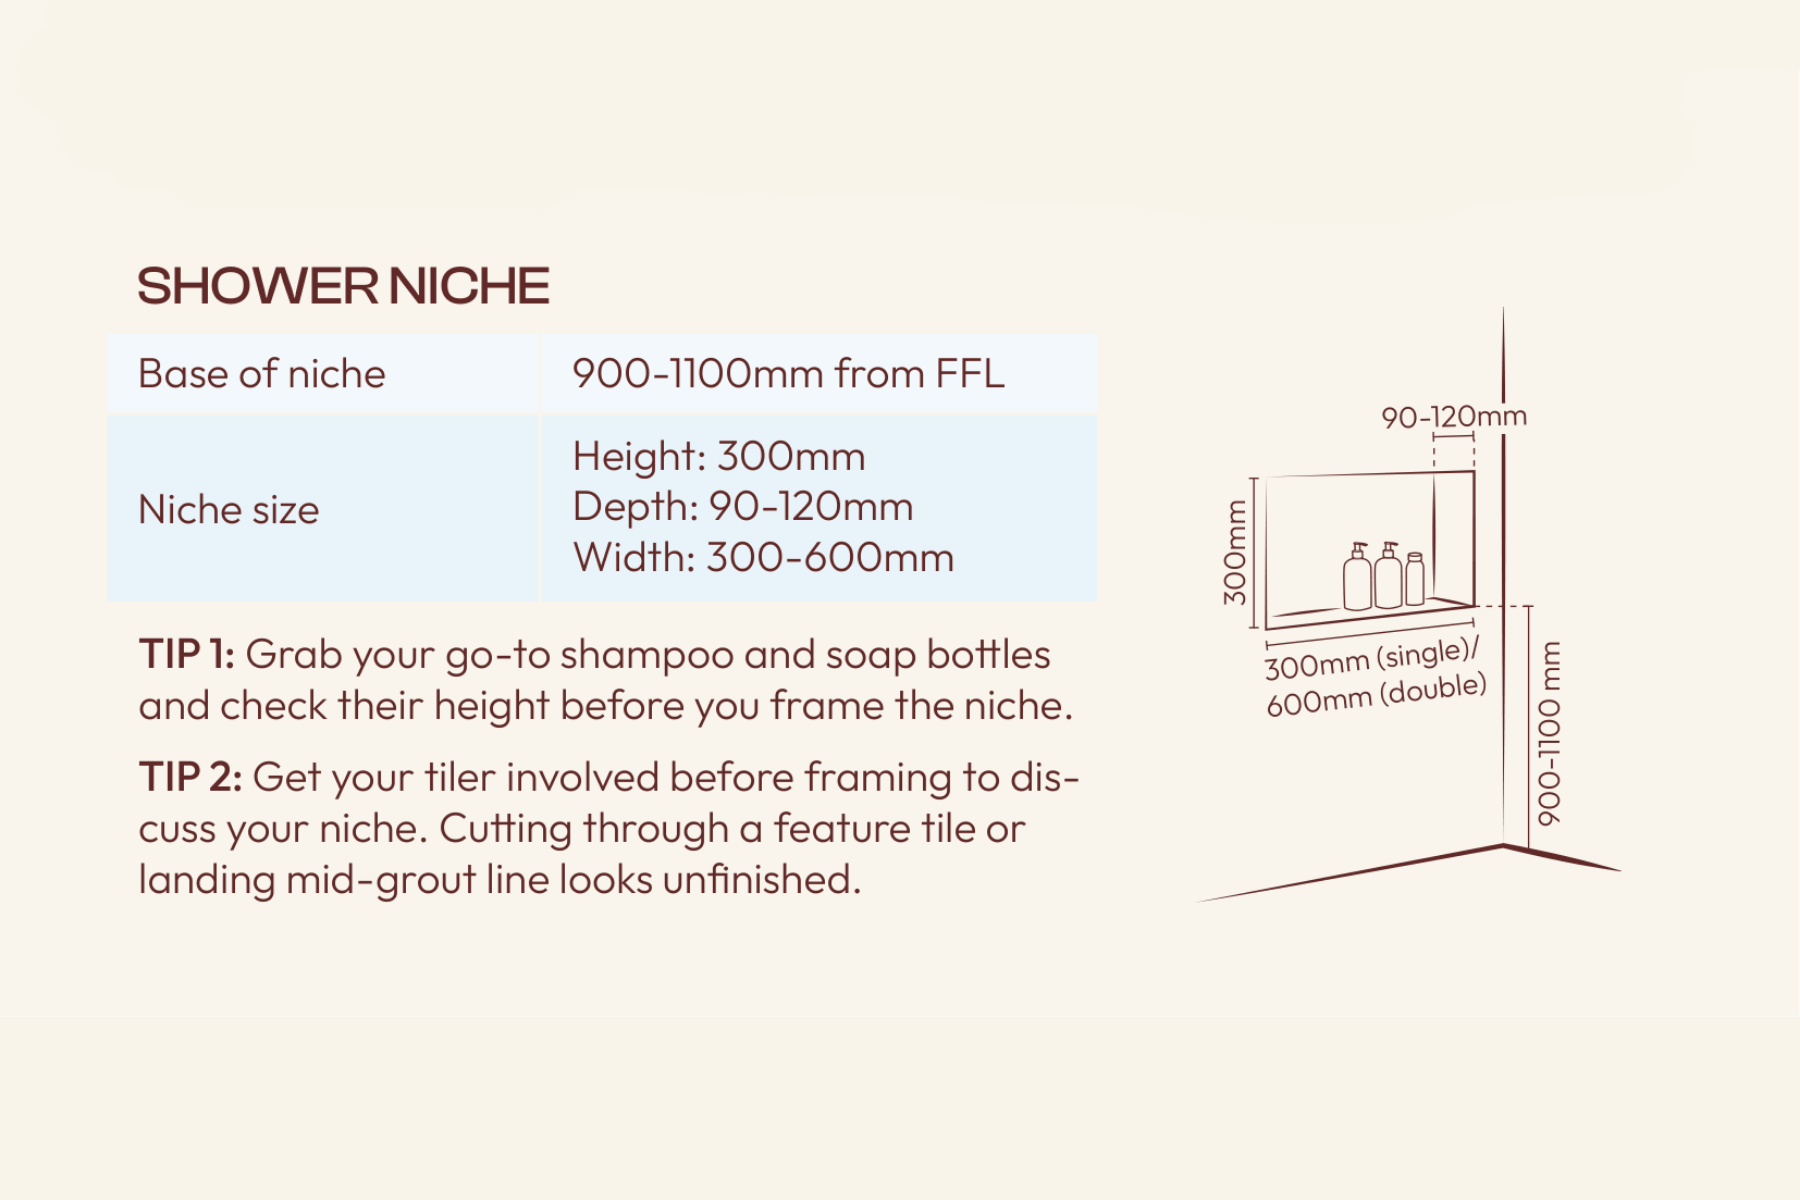
- Base of niche: 900mm to 1100mm from FFL
- Height: 300mm
- Depth: 90mm to 120mm
- Width: 300mm to 600mm
Before framing your niche, grab your everyday shampoo and soap bottles and check their heights first. It’s also worth getting your tiler involved early. A niche that aligns with grout lines and feature tiles will always feel more seamless once the bathroom is complete.
If you’re deciding between a niche and ledge, our guide to tiled bathroom storage can help.
Bath Placement and Measurements
Bath placement is all about balance. Because baths are usually one of the largest fixtures in the room, even small positioning decisions become visually noticeable. Spout placement, mixer height and niche alignment all contribute to whether the bath area feels calm and cohesive.
Freestanding Bath Considerations
Choosing your bath early gives you more flexibility when planning plumbing and tapware placement. Different bath profiles, lip heights and waste locations all affect where your plumbing and tapware should sit. Always select your bath before rough-in — the waste location and spout height both depend on it.
Wall Mounted Bath Spout Placement
Centred bath spouts tend to feel calmer and more visually balanced. In most bathrooms, centering the spout over the bath or waste point creates the cleanest overall look.
Recommended measurements include:
- Spout and mixer: 750mm to 900mm from FFL
- Or 150mm to 200mm above the bath lip
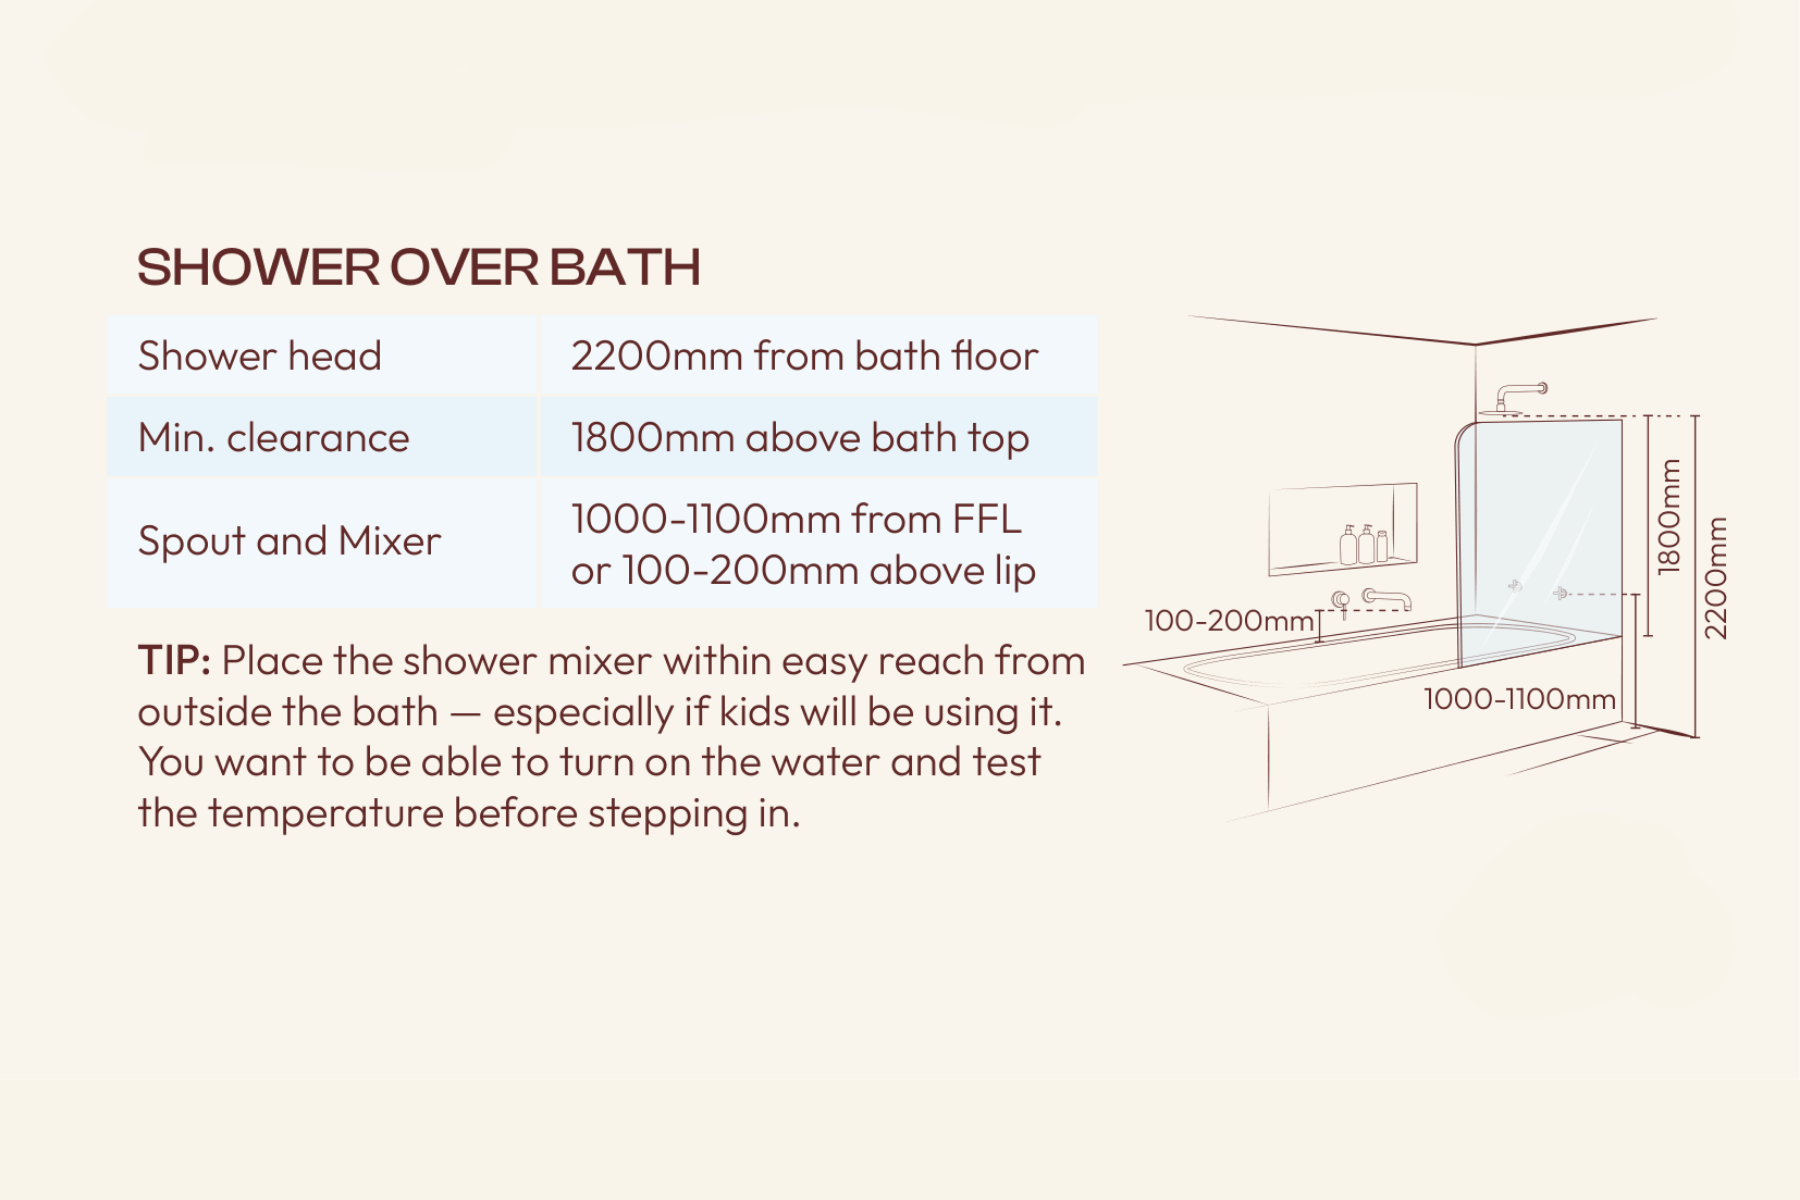
Shower Over Bath Measurements
For shower over bath combinations:
- Shower head: 2200mm from bath floor
- Minimum clearance: 1800mm above bath top
- Spout and mixer: 1000mm to 1100mm from FFL
If kids will be using the bath, position the mixer where it can easily be reached from outside the bath. This makes it easier to test the water temperature before stepping in.
Toilet and Bathroom Accessory Placement
These are often the details people leave until last, but they can have a huge impact on how functional your bathroom feels once you start using it every day.
Good accessory placement should feel natural without needing to think about it.
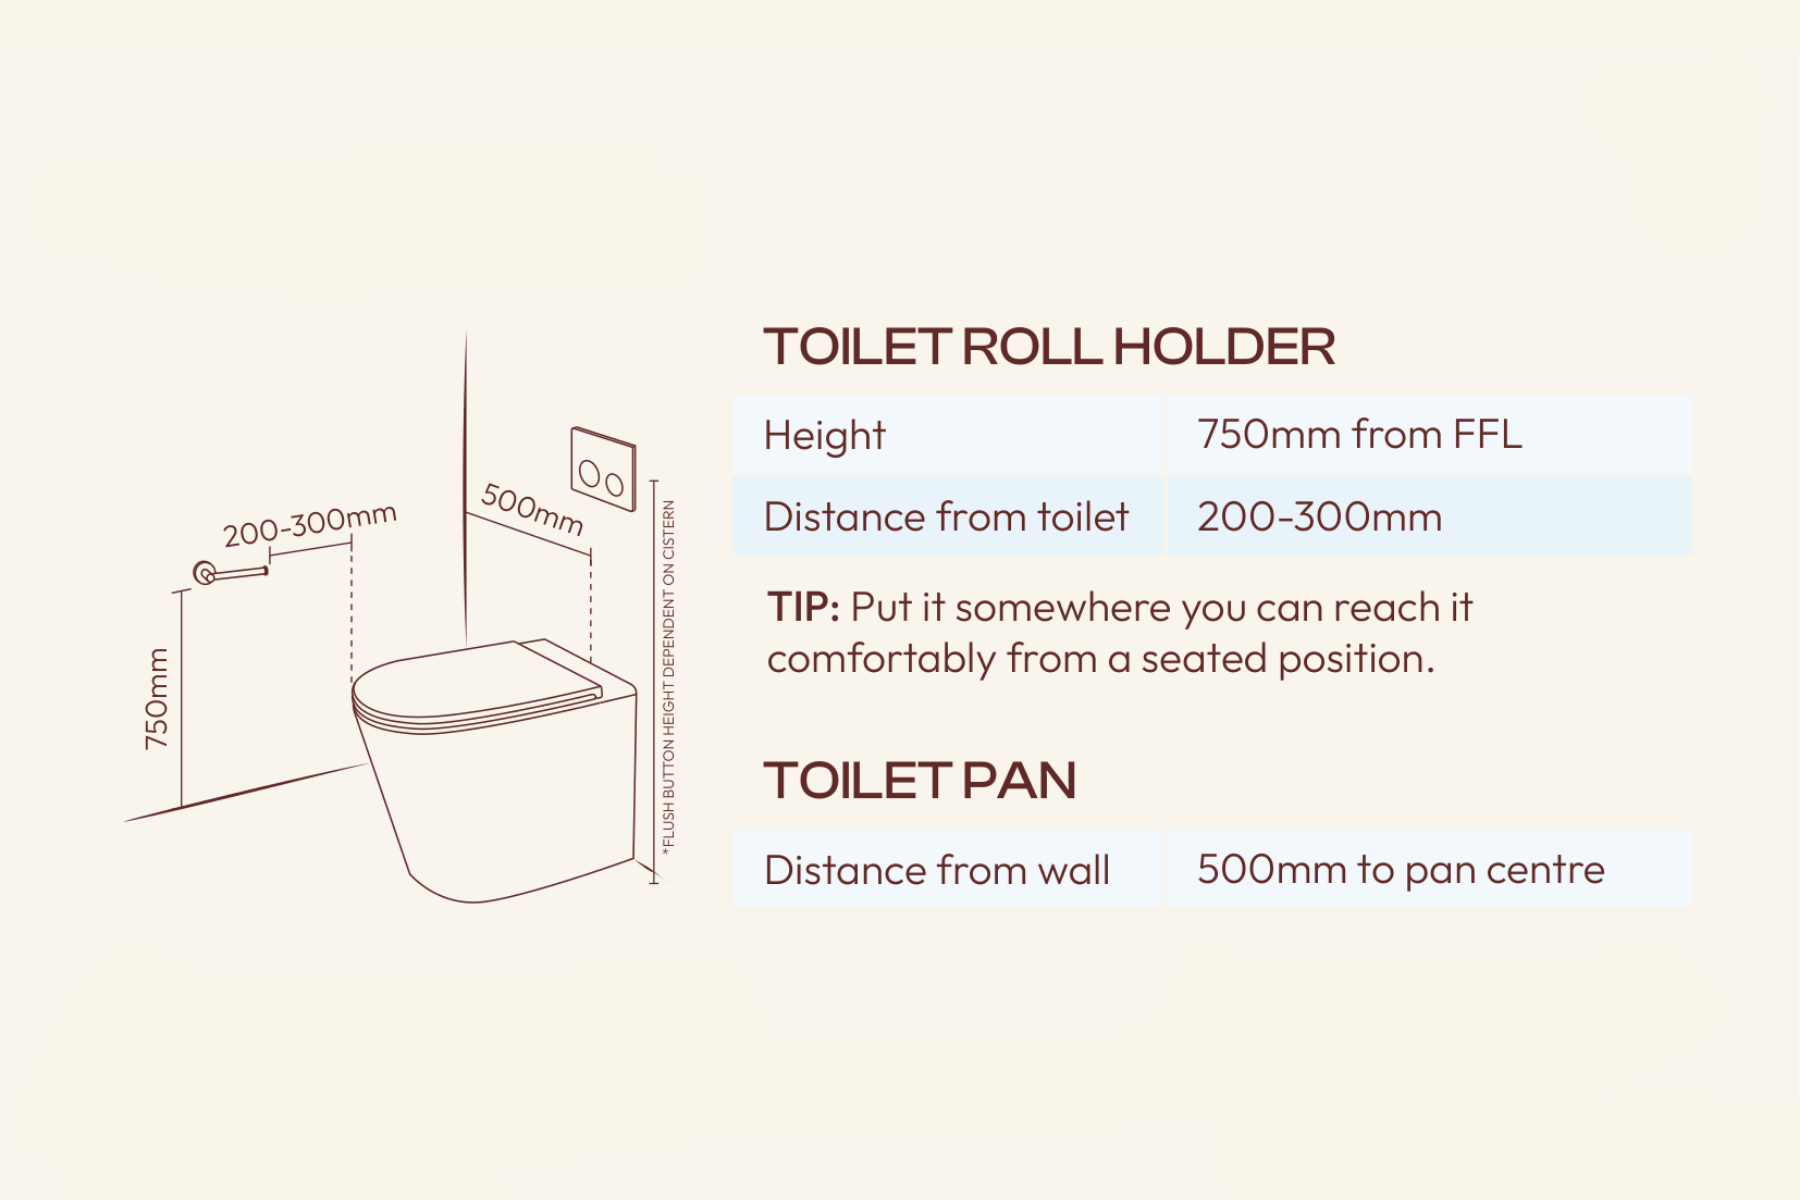
Toilet Placement
Standard toilet positioning:
- 500mm from wall to pan centre
Toilet Roll Holder Height
Recommended placement:
- Height: 750mm from FFL
- Distance from toilet: 200mm to 300mm
The goal is simple: comfortable reach while seated.
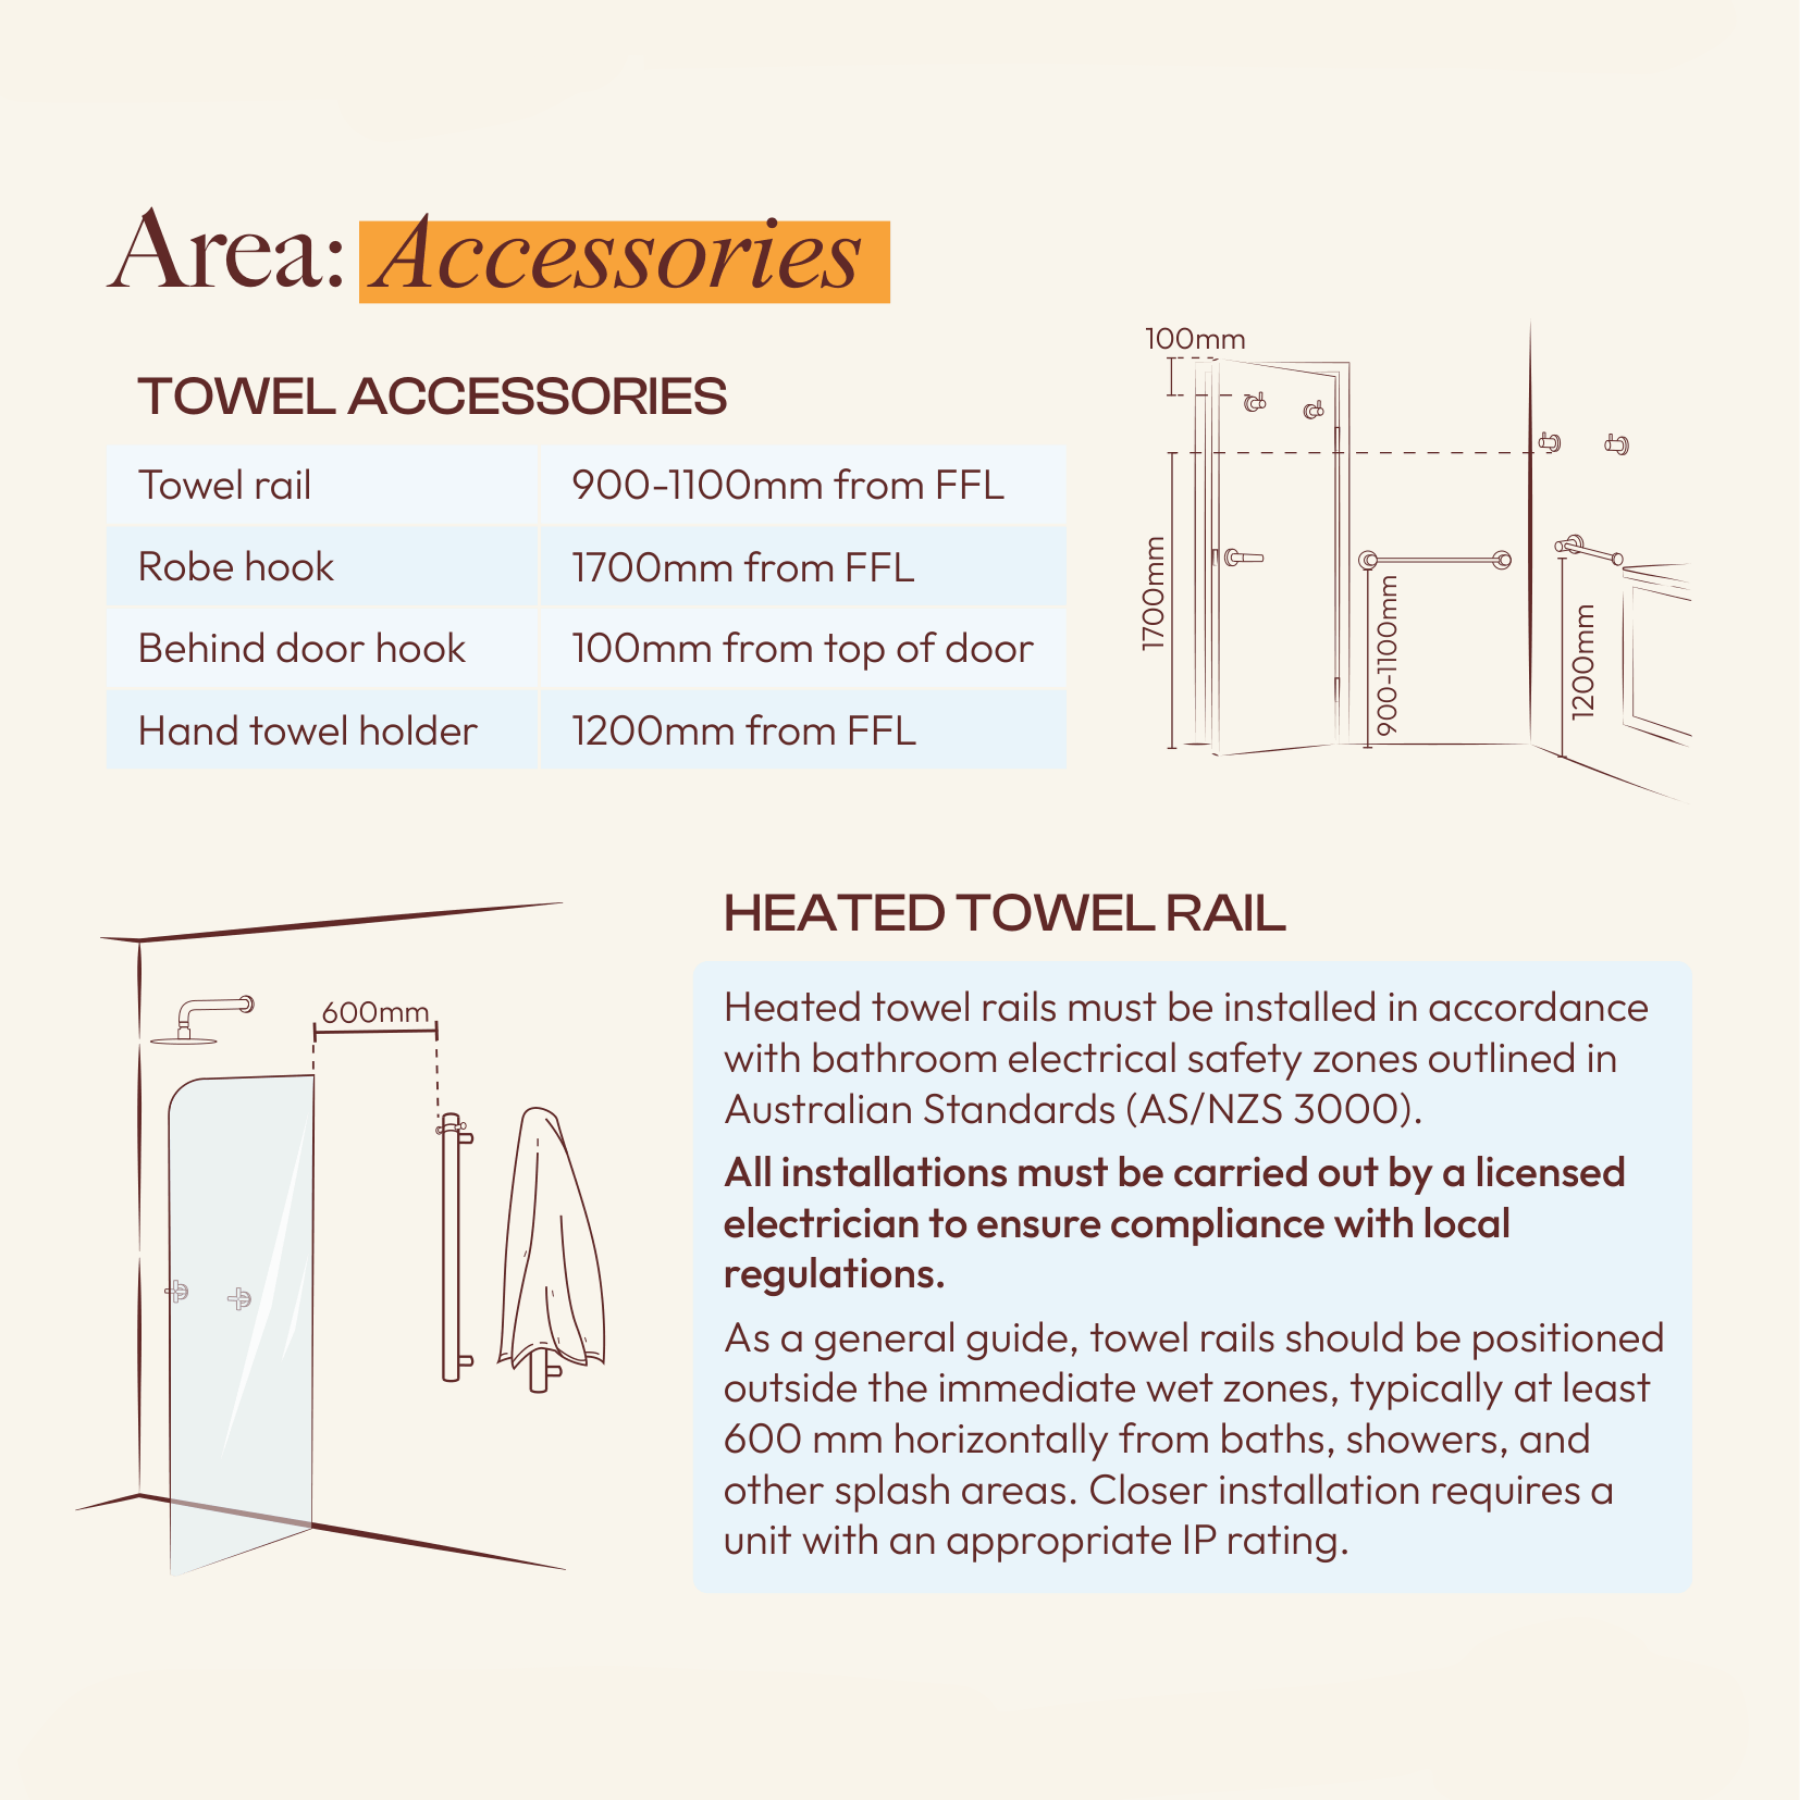
Towel Rail and Robe Hook Heights
These heights are designed around everyday movement.
You want towels to feel easy to grab as you step out of the shower while still sitting high enough to avoid dragging visually.
Recommended measurements:
- Towel rail: 900mm to 1100mm from FFL
- Hand towel holder: 1200mm from FFL
- Robe hook: 1700mm from FFL
- Behind door hook: 100mm from top of door
Exhaust Fan Placement
Mount the exhaust fan directly above the shower, not above the toilet. That’s where the steam is, so that’s where the fan works hardest.
Key Things To Know Before Tiling
Lay Out 1m² First
Before installation begins, physically lay out at least one square metre of your tile pattern on the floor. This shows your tiler exactly what you want and helps avoid confusion around layout direction, pattern and grout joint spacing.
Talk To Your Tiler About Floor Falls
A floor fall is the intentional slope built into the floor to help water drain efficiently toward the waste.
Before tiling begins, have a clear conversation with your tiler about:
- Fall direction
- Drainage points
- Tile suitability
- Shower floor layout
Confirm Your Floor Tile Size
Large format tiles can be difficult to install on shower floors due to the drainage fall required. This is especially important in renovations where the substrate is already set.
Before selecting your floor tiles, check with your tiler which sizes will work best within your layout.
Choose Your Grout Colour Early
Grout colour can completely change the final feel of your bathroom, so it’s worth selecting it alongside your tiles rather than treating it as an afterthought. Whether you want something soft and seamless or more defined and textural, seeing your grout and tile selections together early will help you feel more confident before installation begins.
If you’re selecting trims for niches or external edges, our guide to choosing the right tile trim is worth reading before installation begins.
The bathrooms that feel the most effortless are usually the ones that were planned carefully long before tiles went on the wall. Getting your bathroom measurements right early helps create a space that feels balanced, practical and comfortable to live with every day.
Use these measurements as a guide, but always confirm final placement with your builder, plumber and tiler before installation begins. And if you’re still selecting tiles for your renovation, explore the TileCloud inspiration gallery for real Australian renovation ideas, layouts and finishes designed to help you create a bathroom that feels timeless.
Prefer to keep this handy while planning your renovation? Download the full Bathroom Heights & Placement Guide PDF here.

Layla is a creative at heart, with an Advanced Diploma in Interior Design and being the Senior Marketing and Ecommerce Coordinator here at TileCloud she has a passion for staying up to date with the latest trends within the industry. Known for going down a rabbit hole on Pinterest and being a sucker for a good mood board to kick off any project.